Recently, my dog Bhumie joined our local canine club . The club protects dog owner rights in our small neighborhood like ensuring the existence and maintenance of our dog parks. Signing up meant that Bhumie’s picture would show up on the club’s website which made me browse the existing members/dogs. Looking at the different pages is painful. The site navigation was quickly put and added on without thinking about the user experience.
Feeling that pain made me think about the best way to show that membership data in a simpler and more meaningful way. Displaying all members in one page and displaying them per date would allow for very interesting insights. With the membership data of each members, it would also be possible to draw some interesting charts.
Overview
This post covers the various technical decisions that were required to turn the raw member data into a visualization hosted as a web page on GKE Kubernetes cluster in an automated and secure way.
I will be using different technologies to come up with a functioning result:
- Go
- JavaScript (React )
- Docker
- Kubernetes Primitives and Manifests
- DNS
- HTTP
- Terraform
- Google Cloud Platform
- GitHub Actions
If you want to skip ahead, the code is available at https://github.com/seriousben/club-canin-aylmer-members and the result is at https://club-canin-aylmer.seriousben.com/ .
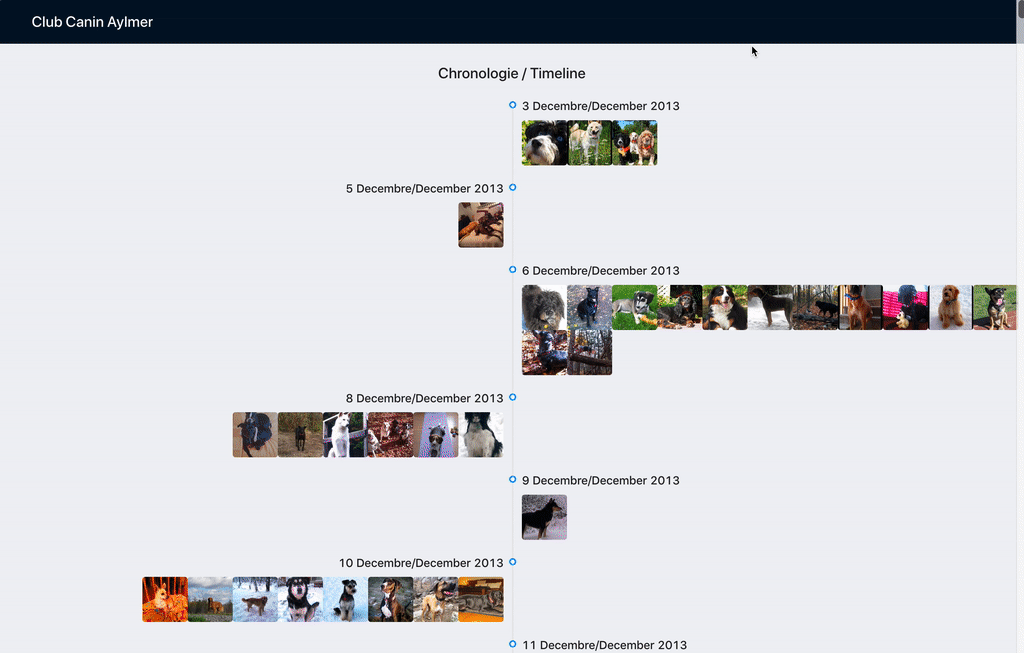
Result of the project
Getting the data
The initial step to be able to display membership information in an interesting way is to get that data. The website has no raw data of the members so I had to improvise. I wanted to get the pictures in two different sizes and the date each member joined the club. The raw data I could work with were:
- the various timestamps of the website (last modified data)
- the list of members with their data: name and picture
- the metadata of the pictures
All the visualizations I wanted to have required the joined date of each member. Unfortunately, that data wasn’t exposed on the website. I thought that the pictures could have interesting metadata like when they were uploaded or created. I hoped that those dates could be used as a way to guess the joined date of a member. To verify that the data could be used as that date, I decided to take a subset of the pictures and see if the dates were spaced out and ordered in a way that would indicate clusters of uploads that I could roughly translate into joined dates. Turns out that the data made a lot of sense.
Metadata of the first member:

Metadata of the first member
Overview of the modified date of some images:
- First page:
September 30, 2015January 19, 2014February 2, 2014December 3, 2013December 10, 2013
- Second page
April 12, 2015April 12, 2015April 12, 2015April 12, 2015April 16, 2015
- Last page: (last members)
December 10, 2019December 3, 2019November 29, 2019
Looking at this, I could see that there were some outliers in terms of ordering. But overall, it seemed possible to determine the date at which a member photo was added to the website. Therefore, allowing the use of that date as the joined date of the membership.
Overall algorithm
After knowing that using the pictures metadata was going to be possible, I had to extract that data from the website. This meant being able to list all member list pages, list all members from a given page, and extract the date and URL of the member image.
# get the list of HTML member pages
memberPages = getMemberPages()

# variable to store all the members
members = []

# iterate over all member pages
for-each mp in memberPages:
    # fetch the data of each members contained within a given page
    membersOnPage = getMembersOnPage(mp)

    # append the members on the page to the list of all members
    members = append(members, membersOnPage)

# send JSON to standard out to allow piping the output to a file
printToJSON(members)
Getting the list of member pages
This is how the current website is setup for browsing members (dogs):

Members menu
Which is basically setup like this:
- Home
- Members
- Members Page 2
- Members Page 3
- Members Page 4
- Members Page 5
- Members Page 6
- …
- Members Page 7
- …
- Members Page 4
- Members Page 3
- Members Page 2
The only way to fetch the details of each member is to parse each of the member pages. But first, I needed to be able to get the list of pages themselves. To do that there were two options that I could take: parsing the HTML of the menu and getting the list of pages or parsing the XML of the sitemap which contains all the pages of a website. Parsing XML is the safest option since the HTML structure of a page tends to change over time when the style of the website changes while the structure of an XML sitemap would never change since it follow the sitemap protocol (https://en.wikipedia.org/wiki/Sitemaps) .
Excerpt of the sitemap.xml:
<urlset>
  <url>
    <loc>
      https://www.clubcaninaylmer.com/devenez-membre.html
    </loc>
    <lastmod>2019-12-18T12:53:11+00:00</lastmod>
  </url>
  <url>
    <loc>
      https://www.clubcaninaylmer.com/membresmembers-page-3.html
    </loc>
    <lastmod>2019-12-18T12:53:11+00:00</lastmod>
  </url>
  ...
</urlset>
Here is the algorithm of how to get the list of pages:
# fetch the sitemap
body = fetchSitemap()

# parse sitemap data
sitemap = parseXML(body)

# variable to store the member pages
pages = []

# iterate through all the urlset of sitemap
for-each url in sitemap.urlset:

    # check if the location of the url contains membresmembers
    if url.loc contains “membresmembers”:

        # append the url location in the list of pages
        pages = append(pages, url.loc)
Getting the list of members from a page
Once I had a list of all the member pages, I needed to extract the data of each member available on the page. To do this, the only datasource I had access to was the content of the HTML page itself and the metadata of each image. So I needed to use an HTML parser to facilitate parsing and navigating the HTML using CSS Selectors . For the images, ideally, I would only want to fetch the metadata of each images. For that purpose, I used an HTTP HEAD verb which allowed me to fetch the headers without downloading the full image.
The data to extract is:
- Name: Extracted from the HTML
- Original image URL: Extracted from the HTML
- Image modified date: Taken from the image metadata
Here is the algorithm allowing the fetching of member data from all the member pages:
# variable to store the list of members for all pages
members = []

# iterate through all member pages
for-each url in memberPages:

    # fetch the HTML of the member page
    page = httpGet(url)

    # parse the HTML
    htmlPage = parseHTML(page)

    # use a CSS selector to find all member nodes in the gallery
    memberNodes = findNodes(htmlPage, "div.galleryInnerImageHolder")

    # iterate through all member nodes
    for-each node in memberNodes:

        # get text of node
        memberName = textNode(node, "div.galleryCaptionInnerText")

        # get attribute href of a tag
        imageURL = attrNode(node, "a", "href")

        # do an HTTP HEAD request against the image URL
        req = httpHead(imageURL)

        # Append the member data in the list of members
        members = append(members, Member{
          name: memberName,
          imageURL: imageURL,
          imageModifiedAt: req.Header["Last-Modified"]
        })
Future
In the future, detecting pictures containing multiple dogs/members and duplicating those would allow us to have better data. Also, comparing various timestamps that are available would be useful to make sure the chosen ones are the best. I would also download the images instead of hot linking to them using their URLs. Also, trying to guess the breed of each dogs from the image would enable some very interesting insights.
Visualizing the data
Visualization of the data is done using React and the Antd component library . One the main feature missing from the Canine club website is to be able to see all members on a single page ordered by date. With that in mind, the timeline component from Antd seemed like a very interesting and easy way of displaying members over time.
Listing members
Here is the functional react component leveraging React hooks and Antd components to display members. This version is not grouping by date.
function App() {
  // Create members state
  const [members, setMembers] = React.useState([]);

  // Create react side effect hook to setMembers after fetching
  React.useEffect(() => {
    async function fetchData() {
      const res = await fetch("/members.json", {});
      const mJson = await res.json();
      const ms = mJson.members.map(m => {
        // parse date
        m.imageUploadedAt = new Date(m.imageUploadedAt);
        return m;
      });
      // sort by date
      ms.sort((a, b) => a.imageUploadedAt - b.imageUploadedAt);
      setMembers(ms);
    }
    fetchData();
  }, []);

  return (
    <Timeline mode="alternate">
      {members.forEach(m => {
        return (
          <Timeline.Item>
            <Avatar
              onClick={() => window.open(m.imageUrl, "_blank")}
              shape="square"
              size={64}
              src={m.imageUrl}
            />
          </Timeline.Item>
        );
      })}
    </Timeline>
  );
}
Future
Displaying the data in charts would allow people to visualize the trends of memberships. Also, mobile support is not perfect. The use of a tool-tip does not work well on mobile. It could easily be fixed by using a popover opening on click with details on each member. Another possible improvement would be to gracefully fall back to an error image when the image of a member doesn’t load.
Packaging
Some general guidelines / constraints:
- the project is to be deployed to Kubernetes
- the project should be contained in one docker image
- the site should have a static list of members
Docker
To perform this, I used docker multi-stage builds .
Source: Dockerfile
# First stage called getmembers
FROM golang:latest AS getmembers

ENV GOOS=linux GO111MODULE=on

WORKDIR /service

# Copy the go sources
COPY membersfetcher/* ./

# Run the membersfetcher code
RUN go run main.go > members.json

# Second stage called build
FROM node:13.2.0-alpine as build
WORKDIR /app

ENV PATH /app/node_modules/.bin:$PATH

COPY package.json /app/package.json
RUN npm install --silent

# Copy the react app
COPY . /app

# Copy the members list
COPY --from=getmembers /service/members.json /app/public/.

# Build the HTML
RUN npm run build

FROM nginx:1.17-alpine

# Copy the HTML + members list in the public folder of nginx
COPY --from=build /app/build /usr/share/nginx/html
This approach allows us to archive the list of members within each docker image. This means that we have a fully self-contained image that has everything it needs to display the members. The images is the only piece of data missing from the docker image.
Abandoned Ideas
Using an API
Using an API would have worked, but would have required having another process running and also to have some form of caching involved to not always do the full crawling of the club website which can take a few minutes.
Future
It would be great to also save and serve a version of each images instead of relying on the images being served and available elsewhere.
Deployment
There are different parts required in order to go from source code to a website. The project is setup with CD (Continuous Deployment) so that every change to the master branch gets deployed. The project is deployed to a Kubernetes cluster as a docker image exposing the website through nginx.
Creating the Kubernetes cluster
The code responsible for creating the cluster is at https://github.com/seriousben/serious-infra . It contains the terraform script to setup the GCP Kubernetes cluster and the DNS zones.
Configuring the cluster
The Kubernetes cluster has a set of core services deployed to be leveraged by applications running on the cluster. These core services are defined in https://github.com/seriousben/serious-core/ .
Allows centralizing all traffic going to our cluster to the same Google Cloud Load Balancer talking to one endpoint on the cluster: nginx.
External DNS - Managing DNS records from Kubernetes.
Allows watching ingress definitions for managed sub-domains to automatically create DNS record on DNS provider.
Jetstack’s cert-manager - Certificate manager to automate let’s encrypt usage.
Allows watching ingress definitions for TLS certificate to automatically create and manage Let’s Encrypt certificate.
Deploying our application
The initial deployment of the application is done manually with Kustomize . Kustomize allows patching some base manifest files for specific environment with common attributes.
We have 3 folders that are involved when running Kustomize to create the manifest to kubectl apply:
deploy/base: Is the folder containing one or many groups of manifests to be Kustomized when pulled into an overlay.deploy/overlay: Is the top-level manifest and kustomization. It defines what to pull from the bases into a main manifest. It adds default annotations, labels and a namespace.deploy/manifest: Outpout of the kustomization of the overlay.kustomize build deploy/overlay > deploy/manifest/kustomized-overlay.yaml
Once the file deploy/manifest/kustomized-overlay.yaml is updated from the base + overlay, it can be applied to the cluster with kubectl apply deploy/manifest/kustomized-overlay.yaml.
Base
The deploy/base folder contains this project’s manifests:
a
deployment: Which defines the pod/container running the HTTP server in terms of Docker image and number of replicas.Source: https://github.com/seriousben/club-canin-aylmer-members/blob/master/deploy/base/deployment.yaml
kind: Deployment
apiVersion: apps/v1
metadata:
  name: frontend
  labels:
    app: frontend
spec:
  # Only one pod for this deployment
  #   (For High availability, having >=2 is preferred)
  replicas: 1
  revisionHistoryLimit: 2
  selector:
    matchLabels:
      app: frontend
  # Define the template of each pod created by the deployment
  template:
    metadata:
      # Define the labels to associate to any pods created by the deployment
      labels:
        app: frontend
    spec:
      containers:
      # Define first and only container of the pod
      - name: frontend
        # Using GitHub Docker registry for the image
        image: docker.pkg.github.com/seriousben/club-canin-aylmer-members/site:latest
        ports:
        - containerPort: 80
      # Defining the secret to access the GitHub docker registry
      #   to fetch the docker image
      imagePullSecrets:
      - name: github-docker-registry
a
service: Which defines how the pods of the deployment can be accessed by finding pods by labels and by defining port mapping.Source: https://github.com/seriousben/club-canin-aylmer-members/blob/master/deploy/base/deployment.yaml (in the same file as the deployment)
apiVersion: v1
kind: Service
metadata:
  name: frontend
spec:
  ports:
  # Port mapping from incoming port 80 to port 80 of pod
  - targetPort: 80
    port: 80
  # Send traffic to any pod with label app=frontend
  selector:
    app: frontend
an
ingress: Which defines how to route to a given service from the outside world. It also defines TLS configuration and Hostname configuration.Source: https://github.com/seriousben/club-canin-aylmer-members/blob/master/deploy/base/ingress.yaml
apiVersion: extensions/v1beta1
kind: Ingress
metadata:
  name: frontend
  annotations:
    # Use nginx-ingress and not the Google Cloud ingress
    kubernetes.io/ingress.class: nginx
    # Automatically get a TLS Certificate from Let's Encrypt
    #  by configuring cert-manager
    cert-manager.io/cluster-issuer: letsencrypt
spec:
  # Name the host of the TLS certificate and the secret in
  #   which the certificate needs to be.
  tls:
  - hosts:
    - club-canin-aylmer.seriousben.com
    secretName: club-canin-aylmer-seriousben-com-tls
  rules:
  # Route all incoming traffic from club-canin-aylmer to
  #   the frontend service at port 80
  #   and automatically register subdomain in DNS zone by
  #   external-dns.
  - host: club-canin-aylmer.seriousben.com
    http:
      paths:
      - backend:
          serviceName: frontend
          servicePort: 80
Continuous Deployment
The continuous deployment of this project uses GitHub Actions .
Here is an overview of the deploy workflow that is triggered for each merge to master:
name: CD

on:
  # Run this file on pushes to master
  push:
    branches:
    - master
  # Also run this file every Wednesday (To automatically refresh the list of members)
  schedule:
  - cron: '20 0 * * WED'

# Environment variables available to all jobs and steps in this workflow
env:
  # Configured in the GitHub UI
  GKE_PROJECT: ${{ secrets.GKE_PROJECT }}
  GITHUB_SHA: ${{ github.sha }}
  GKE_ZONE: us-east1-d
  GKE_CLUSTER: main
  IMAGE: docker.pkg.github.com/seriousben/club-canin-aylmer-members/site
  DOCKER_USER: seriousben
  # Automatically provided by GitHub
  DOCKER_PASS: ${{ secrets.github_token }}

jobs:
  setup-build-publish-deploy:
    name: Setup, Build, Publish, and Deploy
    runs-on: ubuntu-latest
    steps:

    - name: Checkout
      uses: actions/checkout@master

    # Setup gcloud CLI
    - uses: GoogleCloudPlatform/github-actions/setup-gcloud@master
      with:
        version: '272.0.0'
        # Service Account key created specifically for this project
        service_account_key: ${{ secrets.GKE_KEY }}

    # Docker login against the GitHub Docker registry
    - name: Docker login
      run: |
        docker login docker.pkg.github.com -u $DOCKER_USER -p $DOCKER_PASS

    - name: Docker build
      run: |
        docker build \
          -t "$IMAGE":"$GITHUB_SHA" \
          -t "$IMAGE":latest \
          --build-arg GITHUB_SHA="$GITHUB_SHA" \
          --build-arg GITHUB_REF="$GITHUB_REF" \
          .

    - name: Docker push
      run: |
        docker push $IMAGE:latest
        docker push $IMAGE:$GITHUB_SHA

    - name: Deploy
      run: |
        # Get kubectl credentials on the production Kubernetes cluster
        gcloud container clusters get-credentials $GKE_CLUSTER --zone $GKE_ZONE --project $GKE_PROJECT
        # Set the image version of the frontend container of the frontend deployment within the project's namespace
        kubectl set image deployment/frontend frontend=$IMAGE:$GITHUB_SHA -n=club-canin-aylmer-members
Security
In a production environment, I would not expose tokens, API keys or any types of production secrets in GitHub Actions. GitHub Actions are currently very new with possible security problems that have yet to be found. A big security issue was found less than 6 months ago (2019-09-29). It consisted in a secret leak vulnerability that would allow an attacker to get your secrets by just changing code in a fork of your repository. The attack surface is even bigger for public repositories which is the only type of repositories used in this project.
Since this project is in fact using GitHub Actions and exposing sensitive secrets through it, the principal of least privilege is very important. It consists in only allowing a given module to perform actions that are necessary for its legitimate purpose. For the project, it means limiting the possible blast area that would be impacted if the secret was leaked. The secret for this project is used for deployment. It allows calling Google Cloud APIs and also Kubernetes APIs. Restricting the privileges that this secret has is very important to prevent malicious users from taking over my Google Cloud account.
Those restrictions are done in two different layers: in Google Cloud Platform and in the Kubernetes cluster.
That secret used in GitHub Actions is a Google Cloud Platform service account
key. It is used to call Google Cloud APIs to retrieve the authentication data to run kubectl/Kubernetes commands against the cluster. To limit its privileges within the Google Cloud Platform project, a service account is created and assigned a role restricting its permissions. The role it has makes it so that it can only get authentication data and call Kubernetes APIs. The details can be seen in this file: https://github.com/seriousben/serious-infra/blob/master/iam.tf
On the Kubernetes side, the project deployment only needs access to a few operations in the Kubernetes cluster. These operations are the management of deployments, jobs, ingress, configmaps, services, and pods. On top of that, it should only be allowed to manage it’s own resources. So for that reason, the Service Account of the key used by the deployment workflow is scoped to these actions and to the project’s namespace. That Kubernetes namespace is where all the project resources are created in. This Kubernetes restriction is done by creating a Role for that namespace as well as binding that role to the Google Platform Service Account to restrict permissions. It is done in this manifest file: https://github.com/seriousben/club-canin-aylmer-members/blob/master/deploy/overlay/role.yaml
Future
The artifact of this project is a static webpage hosted by a dockerized HTTP server. The hosting server could actually be anything. Using Kubernetes for it is not required and is making the infrastructure very complex. The ideal way would be to use a free static webpage hosting service like https://www.netlify.com/ , https://neocities.org/ , or https://www.nearlyfreespeech.net/ . Using a Content Delivery Network (CDN) like CloudFront , Google Cloud CDN or Cloudflare CDN would also be a good alternative.
Another possibility would be to leverage serverless technologies. AWS Lambda , Google Cloud Run or Cloudflare Workers are all good possible choices to build a great website with simplified infrastructure, a lower cost, and a better performance.
Conclusion
Using various technologies, I built a webpage showing the timeline of memberships of the Aylmer Canine Club.
The code is available at https://github.com/seriousben/club-canin-aylmer-members .
The result is at https://club-canin-aylmer.seriousben.com/ .
Result of the project
References
- Aylmer Canine Club - The website of the Canine club.
- Kubernetes External DNS - Managing DNS records from Kubernetes.
- Jetstack’s cert-manager - Certificate manager to automate let’s encrypt usage.
- Kustomize - Kubernetes manifest management.
- Let’s Encrypt - The free, automated, and open Certificate Authority.
- HashiCorp Terraform - Declarative infrastructure as code tool.
- HashiCorp Terraform Google Cloud Platform Provider - Documentation on how to leverage terraform for managing infrastructure on GCP (Google Cloud Platform).